JavaScript tab


Create your own business logic in the JavaScript tab. The figure shows an email input field. It only allows valid email addresses. A JavaScript function is added that adds an additional check and only allows email addresses of certain hosts. Another JavaScript function changes the number format of an input field for a currency: always show the current sign (EUR) and exactly two decimal digits.

JavaScript

Any JavaScript you write in the JavaScript tab, is loaded automatically. It get executed once the form has finished loading (document.ready. That is, when all form elements are available and you can access them.

The same does not apply to JavaScript you uploaded as a client or form file. It also get loaded automatically, but is run as soon as it finished loading. When necessary, wait manually until the form has finished loading:

$(function(){
 /* code goes here */
});

You can configure many features directly with the user interface of the Xima® Formcycle Designer. This includes marking form fields are required fields, hiding or showing form fields depending on certain conditions and many more options. Still, you may find it necessary at times to write you own custom business logic for your forms. This is what the JavaScript tab allows you to do. As the name implies, this tab lets you write your own JavaScript code. It gets loaded automatically when the form is opened. 

JavaScript is supported by all modern browsers. But please note that JavaScript is an active language. New versions of the language are constantly released every few year. Not all browsers may support the latest version yet. You should always check which browsers you are required to support or are willing to support, and not use any unsupported features:

Special care is required when you would like to support the browser Internet Explorer. This browser is not in active development any longer and does not support many modern features. This includes, but is not limited to:

  • Fetch-API, a native method similar to jQuery.ajax
  • Promise-API, letting you handler asynchronous processes more easily, such as network requests
  • New syntax such as arrow function, async functions, object destructuring or classes
  • etc.

In these help pages, we give two versions for JavaScript examples (when different). Once for modern JavaScript and once for legacy JavaScript that can be understood by Internet Explorer. This might look as follows:

const sayHello = ({firstName = "John", lastName = "Doe"}) => console.log(`Hello, ${firstName} ${lastName}!`);
sayHello({lastName: "Brown"});
function sayHello(options) {
 var firstName = typeof options.firstName === "undefined" ? "John" : options.firstName;
 var lastName = typeof options.lastName === "undefined" ? "Doe" : options.lastName;
 var greeting = "Hello, " + firstname + " " + lastName + "!";
  console.log(greeting);
}
sayHello({lastName: "Brown"});

Xima® Formcycle makes use of the JavaScript library jQuery. jQuery is an active library that provides some helper functions, but more importantly, makes it easier to work with HTML elements (the DOM). You can select elements and form fields with CSS selectors and work with them by using one the many function provided by jQuery and Xima® Formcycle. It also abstracts native DOM functions, so if you use one of jQuery's functions, you can expect that function to work in the same way across all supported browsers.

We currently provide you with the latest version, jQuery 3:

Help pages and tutorial for jQuery:

Element selection

The ID should not be used directly to select form elements. It is dynamically generated by Xima® Formcycle and can change at any time. For the same reason, you should also not use the attribute xi either.

The first step when you want to work with forms via JavaScript? To select a form field, so that you can access its value, change its value, or listen for changes. jQuery uses CSS selectors to locate HTML elements. The following gives a short overview some common selectors. See selectors  for more information.

Select a form field by name
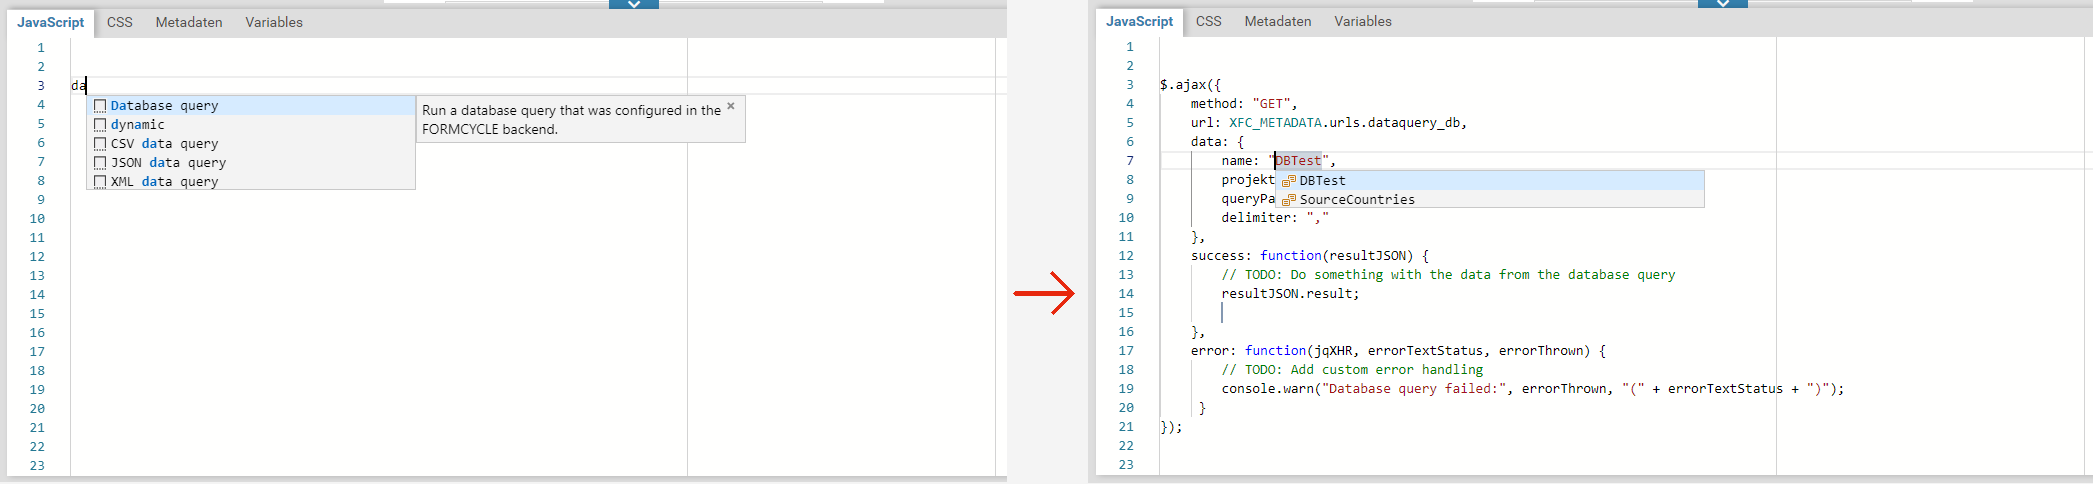
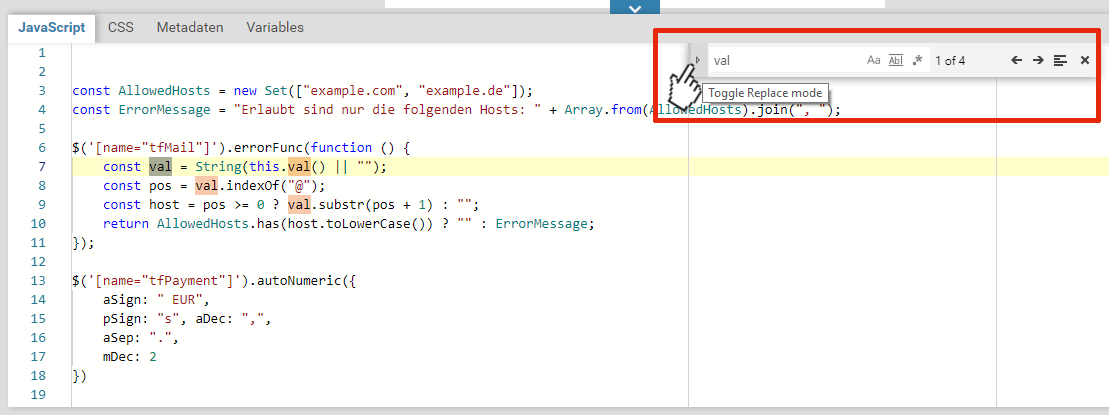
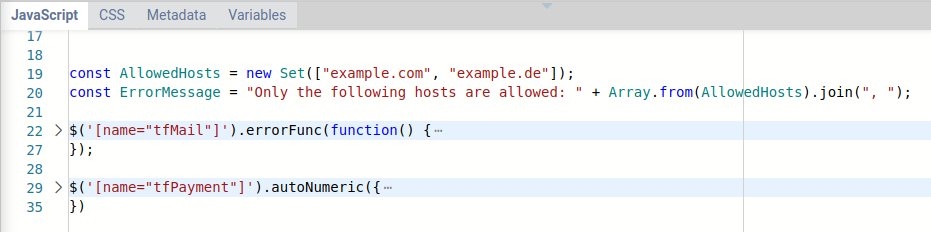
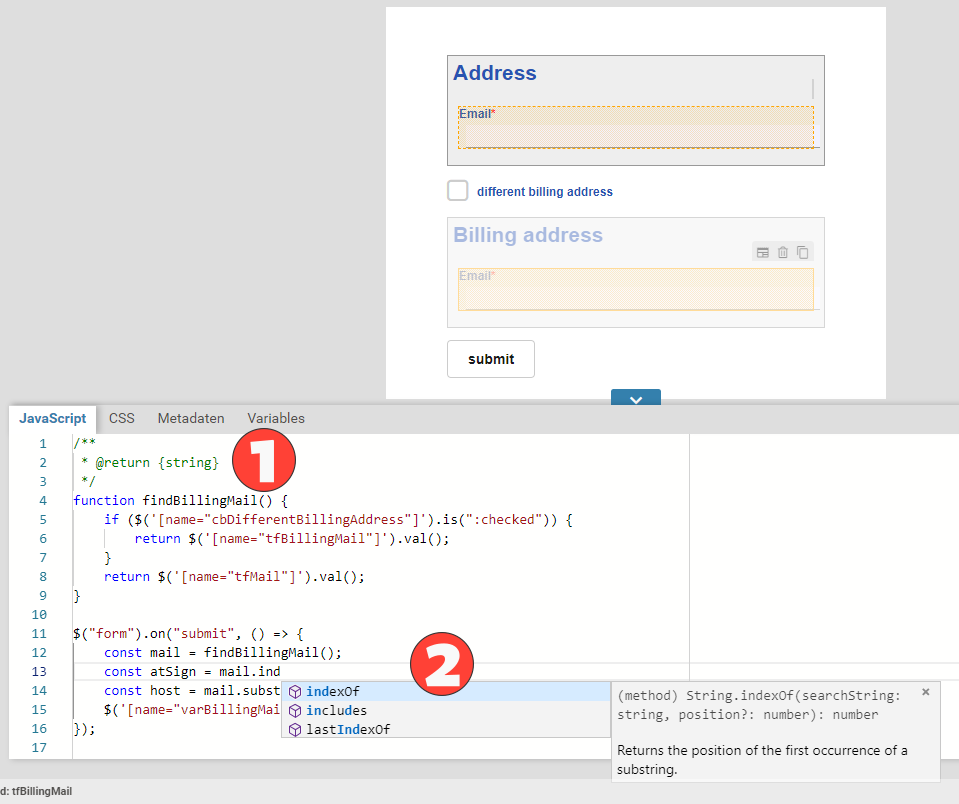
The most common use case is to select a form element by its name. This is the name you can view and edit in the base properties section of the properties panel of the Xima® Formcycle Designer. The name of a form field is written as the HTML attribute name. So to select a form field named tfMail, use the selector $("[name='tfMail']").
Select elements with custom attributes
You can also assign custom attributes to a form field. This is done in the attributes section of the properties panel. They are added to the HTML element. To select all element with a certain custom data attribute: $("[data-attribute='value']")
Select the container of a form field
All form elements are placed inside a container element. This element contains some additional elements such as the label for input fields and select elements. To select the container, use the attribute xn: $("[xn='tfMail']").
Select form fields by their type
Each type of form element (such as pages, text areas, buttons, or checkboxes) have got a certain CSS class. If you want to select, say, all input fields that were placed inside a fieldset, use: $('.XFieldSet .XTextField').
Selecting variables
You can create variables in the Xima® Formcycle Designer. This add hidden input fields to the form. Each variable has got a name. To select them, use a name selector, such as $("[name='tfVariable']")

Editor

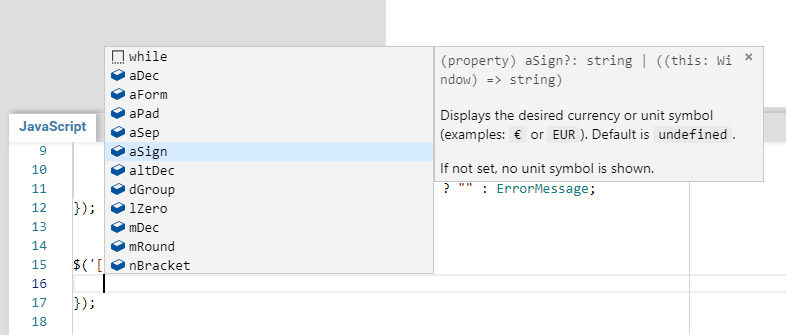
The JavaScript tab provides you with an intelligent code editor that supports you and lets you write you JavaScript smoothly and quickly. The editor we make use of is called monaco editor. Here is a quick overview over some of the main features:

Code snippets are small, independent parts of a programm that can be reused. For some common requirements we help you out with code snippets to reduce the amount of boilerplate you need to write. The figure above shows what happens when you add the code snippet for a database query. Once you confirm by pressing enter, the code snippet for running a database query is inserted automatically. All that is left for you to do now is to modify the relevant parts of the code snippets. That is, the name of the database query and what should happen with the data once its loaded. Some available code snippets include the data queries database query, CSV data query, JSON data query, XML data query and LDAP query; as well as the event handlers click, blur und change.

The autocomplete features makes it easier and faster to select form fields. As you type, you get a list of suggestions with matching form fields. When you select a suggestion and press Enter, a jQuery selector for that form field is inserted automatically. So when you type tfMail and press enter, you get $("[name='tfMail']").

As the size of a JavaScript file grows, finding a certain location becomes harder. This is where the search bar can help you out. Open the search bar by pressing ctrl + f. It opens near the top right corner of the editor. Enter a text to search for and the editor highlights all occurrences of that text. To start a case-sensitive search, click on the icon to the right of the search bar. Lastly, when you want to replace some text with another text, enter the replace mode by either pressing ctrl + h or by clicking on the arrow to the left of the search bar.

For functions, you can expand or collapse the content of that function. To do so, press on the + and - button to the left of the area in the side bar with the line numbers. This may help to organize long code and help you to you recognize the code's structure.

When code is badly formatted, it becomes hard to read and understand. This is where the code formatting feature comes in handy. Do a right click on the editor window to open the context menu. Then click on the option to format the current document. Alternatively, you can also select a portion of the code you want to format and click on the option to format the current selection.

The editor is able to recognizes some types of errors. Parts marked in green are potential mistakes, but they are not critical errors. When a part is marked in red, this usually indicates a syntax error. You should read the detailled error message by hovering over the error and correct it. Shown in the figure above is an error that is caused by a missing comma after minSize.

The autocomplete feature also helps you out with jQuery and other JavaScript functions. As you type the editor suggests you a list of possible properties and functions you can use. It tries its best not to suggest any options that would not make sense in the current part of the code. But please keep in mind that the suggestions may not always be completely accurate (as JavaScript is a loosely typed language). If you want to get a list of suggestions for the current part of the code, press ctrl + space. For most methods and properties, the editor also shows you a short description telling you about what the property is or what the function does. This descriptions consists of two parts: (a) the inferred data type of the property or function, which uses typescript sytnax; and (b) a short plain-text explanation for the property or function. When you have just opened the Xima® Formcycle Designer, the descriptions are hidden. Click on the blue   icon in the list of suggestions to show them.

Autcomplete also works with function calls and objects. The user needs to enter the required payment in a text field. To help the user, we would like to show the currency sign (such as EUR) in the text field as well. We already wrote the following code in the JavaScript tab: $("[name='tfPayment']").autoNumeric({}). Our cursor is now between the two curly braces ({}). Here we have to enter the options that we would like to pass to the JavaScript library autoNumeric. So we press ctrl + space to trigger the autocompletion feature. The editor recognizes that we are calling the method autoNumeric on a jQuery object, and presents us with a list of possible options. We navigate to aSign and are told that this is indeed the right option to set the currency. Finally we press enter to accept the suggestion and give it the currency sign we want.

To get the intelligent autocomplete feature to work, the editor needs to know about the data type of the various different symbols and functions used in the code. Otherwise, it could not restrict the list of suggestions to those that make sense for the current part of the code. It also needs to know about a function's arguments and its return value. While the editor can often figure this out on its own, sometimes it may need some help. You can do so by providing the editor with some helpful comments on your functions. As an added benefit, these comments also help other people who have to read your code. Use a comment like @return {<datentyp>} <beschreibung> to tell the editor about the return type of a function; and @param {<datentyp>} <parametername> <beschreibung> to give it more information about a function argument. To specify the data type, you need to use typescript syntax. In the figure above, we wrote a function that returns the result of calling jQuery.fn.val on a text input field. This jQuery method may also return a number or nothing at all, but for existing input fields, it always returns a string. We tell the editor about this fact by adding a comment. When we call this function later on, the editor knows that it returns a string, and offers all methods that are available for strings.