Plugin development
Plugins let you extend Xima® Formcycle and add new features. Various different plugin type exist, such as plugins for adding custom workflow actions ands triggers, or plugins for new form elements.
A plugin must be a JAR file with the appropriate class files. To create a custom plugin, you need to setup a Java project, such as via Maven.
API documentation
The API documentations for Xima® Formcycle can be found here: Javadocs
Project setup
To get started with developing plugins, you need to create and configure new project.
We recommend the build tool Apache Maven. Other build tools such as Gradle are possible, but you will not find any help for those tools here.
To access the Xima® Formcycle dependencies, you need to use the Maven repository https://artifactory.xima-services.de/artifactory/fc-plugin-dev. This contains all Maven artifacts required for developing plugins.
To get Maven to recognize that repository, add it tot the Maven configuration file settings.xml. Usually, you can find this settings file in the .m2 folder in your home directory, i.e. ~/.m2/settings.xml for Linux and %homepath%\.m2\settings.xml for Windows:
~/.m2/settings.xml
<settings xsi:schemaLocation="http://maven.apache.org/SETTINGS/1.1.0 http://maven.apache.org/xsd/settings-1.1.0.xsd" xmlns="http://maven.apache.org/SETTINGS/1.1.0"
xmlns:xsi="http://www.w3.org/2001/XMLSchema-instance">
<!-- Add XIMA artifactory -->
<profiles>
<profile>
<!-- FORMCYCLE dependencies -->
<repositories>
<repository>
<snapshots>
<enabled>false</enabled>
</snapshots>
<id>xima</id>
<name>fc-plugin-dev</name>
<url>https://artifactory.xima-services.de/artifactory/fc-plugin-dev</url>
</repository>
</repositories>
<!-- Maven plugins for FORMCYCLE -->
<pluginRepositories>
<pluginRepository>
<snapshots>
<enabled>false</enabled>
</snapshots>
<id>xima</id>
<name>fc-plugin-dev</name>
<url>https://artifactory.xima-services.de/artifactory/fc-plugin-dev</url>
</pluginRepository>
</pluginRepositories>
<id>xima-artifactory</id>
</profile>
</profiles>
<!-- Enable XIMA artifactory by default -->
<activeProfiles>
<activeProfile>xima-artifactory</activeProfile>
</activeProfiles>
<!-- FORMCYCLE specific Maven plugins provided by XIMA -->
<pluginGroups>
<pluginGroup>de.xima.fc.maven.plugin</pluginGroup>
</pluginGroups>
</settings>
Maven project setup
The following lists a few important steps required for setting up a Maven project for a Xima® Formcycle plugin, but we assume you have basic knowledge of how to work with Maven.
To get started with a plugin, you can also use of of the available Maven archetypes.
Artekfakte und Abhängigkeiten
You can download a complete pom.xml for plugin development .
The main artifact you need to include is the artifact fc-plugin-common. It contains all Java interfaces available for plugins.
Add the following to the pom.xml of the plugin project to include that artifact:
<xfc.version>7.2.1</xfc.version>
</properties>
<dependencies>
<dependency>
<groupId>de.xima.fc</groupId>
<artifactId>fc-plugin-common</artifactId>
<version>${xfc.version}</version>
<scope>provided</scope>
</dependency>
</dependencies>
For more complicated plugins, you can also include fc-logic, which provides more Xima® Formcycle related classes, such as the database access objects when you need to access the database. If you want to use it, replace dependency to fc-plugin-common with:
<groupId>de.xima.fc</groupId>
<artifactId>fc-logic</artifactId>
<version>${xfc.version}</version>
<scope>provided</scope>
</dependency>
Note that all dependencies must be declared with the provide scope. This prevents class path issues and keeps the plugin size small. When possible, use libraries already used by Xima® Formcycle, e.g. certain Apache Common libraries or guava. Also use the provided scope for such dependencies. A simple way to manage versions and avoid mistakes is by including the FORMCYCLE Bom:
<dependencies>
<!--Import dependency versions from FORMCYCLE -->
<dependency>
<groupId>de.xima.fc</groupId>
<artifactId>fc</artifactId>
<version>${xfc.version}</version>
<type>pom</type>
<scope>import</scope>
</dependency>
</dependencies>
</dependencyManagement>
Then just declare the dependency you wish to use without a <version>...</version>. If FORMCYCLE already provides that dependency, you won't get a build error. Otherwise you need to include the dependency in the plugin: Remove the provided scope and add the version.
Manifest und Fat JAR
The META-INF/MANIFEST.MF file in the plugin JAR should contain the following entries:
- formcycle-version-requirement
- Required. The version of Xima® Formcycle against which the plugin was compiled. This is required for Xima® Formcycle to check the compatibility when the plugin is installed.
- Implementation-Version
- Required. The version of the plugin, which is for example shown in the UI.
- Plugin-Key
- Required. This is used by Xima® Formcycle to identify the plugin, and also used by e.g. the deploy or server plugin. Recommended value is ${project.groupId}:${project.artifactId}.
- Build-Time oder Build-Timestamp
- Optional. This is displayed in the UI when the plugin version is a SNAPSHOT.
You can use the maven-assembly-plugin to add these entries to the manifest.
Furthermore, it is required that you create a fat JAR. Dependencies provided by Xima® Formcycle should be declared with the scope provided, as mentioned above. However, any additional dependencies that your plugin needs must be included in the JAR file.
This can be done via the maven-assembly-plugin or via the maven-shade-plugin. The latter one is meant for advanced use cases, such as when multiple dependencies have conflicting files and you need to merge those.
For many plugins, the maven-assembly-plugin is sufficient. You can configure this plugin in the pom.xml as follows:
maven-assembly-plugin in pom.xml
<maven-assembly-plugin.version>3.3.0</maven-assembly-plugin.version>
</properties>
<build>
<finalName>${project.artifactId}</finalName>
<plugins>
<plugin>
<groupId>org.apache.maven.plugins</groupId>
<artifactId>maven-assembly-plugin</artifactId>
<version>${maven-assembly-plugin.version}</version>
<executions>
<execution>
<id>fat-jar</id>
<phase>package</phase>
<goals>
<goal>single</goal>
</goals>
<configuration>
<finalName>${project.artifactId}</finalName>
<appendAssemblyId>false</appendAssemblyId>
<descriptorRefs>
<descriptorRef>jar-with-dependencies</descriptorRef>
</descriptorRefs>
<archive>
<manifest>
<addDefaultImplementationEntries>true</addDefaultImplementationEntries>
</manifest>
<manifestEntries>
<formcycle-version-requirement>${xfc-version}</formcycle-version-requirement>
<Build-Timestamp>${maven.build.timestamp}</Build-Timestamp>
<Implementation-Title>${project.groupId}:${project.artifactId}</Implementation-Title>
<Implementation-Vendor-Id>${project.groupId}</Implementation-Vendor-Id>
<Implementation-Version>${project.version}</Implementation-Version>
</manifestEntries>
</archive>
</configuration>
</execution>
</executions>
</plugin>
</plugins>
</build>
Build and install
In general, the command to build the plugin depends on the settings in the pom.xml. In most cases, however, the following standard command should be enough:
This creates a JAR file in the target folder. You can then upload this plugin to a running Xima® Formcycle server, either as a client plugin or as a system plugin.
See the deploy plugin to upload the plugin to a running Xima® Formcycle server during the Maven build process.
See the FC server plugin for starting a simple Xima® Formcycle server.
Maven archetypes
For some common plugin types, we provide Maven archetypes to help you get started.
If you added the XIMA artifactory to the ~/.m2/settings.xml as described above, you can create a new plugin project from an archetype via the following CLI command:
This prompts for a few required details such as the desired Maven coordinates of the new project, then creates a new folder in the current working directory with a preconfigured Maven project.
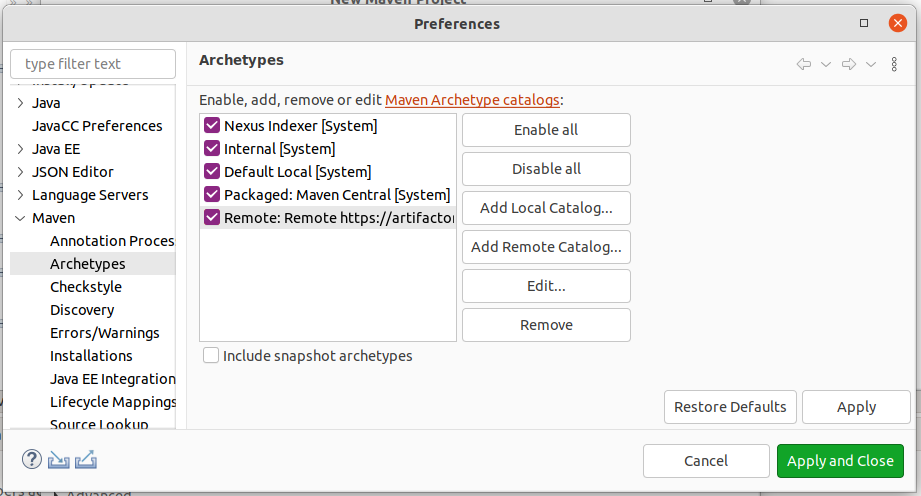
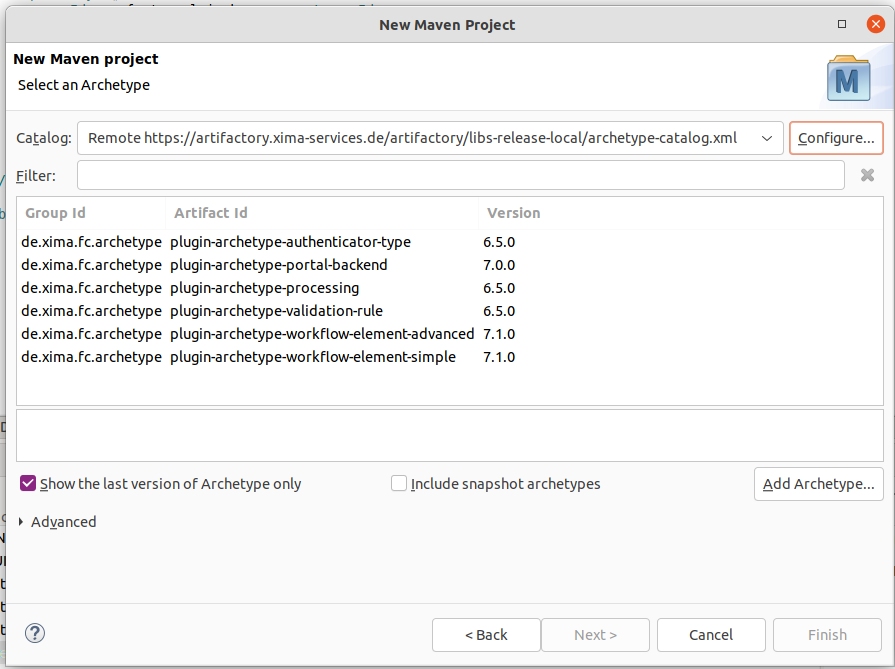
See the archetype catalog for a list of available archetypes.
If you are using Eclipse, you can also add the archetype catalog in the Eclipse settings. Eclipse will then show you the available archetypes when you create a new Maven project with the builtin wizard.
Deploy plugin
When developing a plugin, you often need to build a new snapshot version and upload it to a running Xima® Formcycle server. To ease that process, the deploy plugin can be used to upload the plugin automatically as part of the Maven build process. It consists of two parts:
- A Maven plugin, which is run at the end of the build process and sends the plugin JAR file to a running Xima® Formcycle server via HTTP.
- A Xima® Formcycle plugin, which provides the endpoint that takes the plugin from the HTTP requests and installs it to Xima® Formcycle.
For more details, see help page of the deploy plugin. For most cases, you do not need any configuration in your pom, but we recommend you at least pin the version to a specific release:
<fc-deploy-plugin-maven-plugin.version>7.0.1</fc-deploy-plugin-maven-plugin.version>
<build>
<plugins>
<plugin>
<groupId>de.xima.fc.maven.plugin</groupId>
<artifactId>fc-deploy-plugin-maven-plugin</artifactId>
<version>${fc-deploy-plugin-maven-plugin.version}</version>
</plugin>
</plugins>
</build>
Assuming the deploy plugin is installed as a system plugin of a Xima® Formcycle server, you can build and upload your plugin project as follows:
This assumes that Xima® Formcycle is running on the standard URL http://localhost:8080/xima-formcycle and that the deploy plugin uses the default password "admin". If that is not the case, you can also change these values:
If you want to upload the plugin in a client scope, add the parameter -DfcDeployClientId=3 with the ID of the client.
FC server plugin
To test a plugin, you will need a running Xima® Formcycle server. The fc-server-maven-plugin can be used to start a fully configured Xima® Formcycle server with just a single command. It also comes with the deploy plugin preinstalled.
If you added the pluginGroup to the ~/.m2/settings.xml as described above, you can start a Xima® Formcycle server with the following CLI command:
mvn fc-server:run-ms-war
# Start a specific version
mvn de.xima.fc.maven.plugin:fc-server-maven-plugin:7.0.4:run-ms-war -DxfcVersion=7.0.16
After a short amount of time (may take longer when you start it for the first time), you have a local Xima® Formcycle server running. The URL is printed in the command line, and should be http://localhost:8080/xima-formcycle by default. The super user login is sadmin (password: admin), the client admin access is admin (password /admin_).
When you run the command in the root folder of a Maven project, the project is packaged, uploaded to server and installed. Also, the FC server Maven plugin tries to read the Xima® Formcycle version from the plugin.
Falls der Befehl in einem Maven-Projekt eines Xima® Formcycle-Plugins ausgeführt wird, dann wird das Plugin automatisch gebaut und nach dem Starten des Servers hochgeladen und installiert.
This command works even in a directory without a Maven project. When no Xima® Formcycle version is given, a default one is used.
For advanced usage, see the .