Installing a frontend server
A frontend server is optional and is responsible for serving forms to users. There are several reason to setup a frontend server, including:
- Isolate the intranet with Xima® Formcycle backend from the internet.
- Load balancing. But note that all the form data is still processed on the master server.
Requirements
To use a frontend server, make sure that:
- a master server was installed successfully and has got a license that allows for frontend servers
- the master can access the frontend server via the network. Also make sure that the port is open (default port is 4753).
Step 1: Install the frontend server
The following describes the installation for the application server Apache Tomcat. If you are using another application server, refer to the corresponding documentation of that server.
Using the Apache Tomcat manager
- Start Apache Tomcat.
- Invoke the Tomcat manager and login with the corresponding data, if neccessary.
- In the surface of the Tomcat manager you can find the section Upload local War file for installation. Choose the installation file frontend-server.war on your local system via the button searching... Afterwards approve the selection via the button install below the textfield.
- After the successful installation, the entry xima formcycle frontend-server in the table application and a report similar to the following:
If an error message shows up that reads SizeLimitExceededException, the maximum upload size of the manager must be adjusted in the web.xml. See also the Tomcat documentation and the help pages on Tomcat settings.
Manual installation
You can also install the frontend server manually. Just copy the file frontend-server.war to the webapp directory. You can find this directory inside the folder where Tomcat is installed.
- Copy the provided file frontend-server.war to the directory webapps
- Restart the Appache Tomcat application server
- Tomcat unpacks the war file, completing the installation
Test the installation
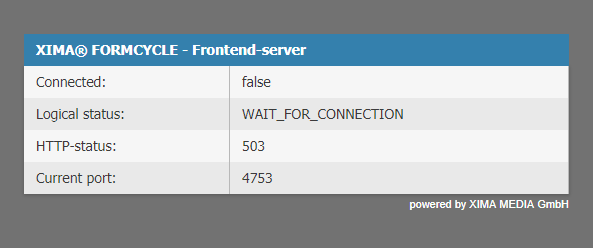
Go to the Url http://meinServer/frontend-server. An HTML page with the current status of the connection should be displayed.
Step 2: Connect the master server to the frontend server
Login as the system administrator (username sadmin). Go to the system menu frontend server and add a new frontend server. See the help pages on the frontend server menu for futher details.
Now the system can connect to the frontend server. To use it with a form, you first need to allow the client of that form access to the frontend server.
Step 3: Allow access to the frontend server for a client

Now you need to grant a client access to the frontend server. Log in as a client administrator. Go to frontend server menu and configure the frontend server connection. For more details, see the help pages on the frontend server menu.
Step 4: Setup an encrypted communication
- Create a new keystore (type: JKS) with a key pair. For example, keystore name: fs.keystore) There are several tools available for creating the keystore, such as the freely available KeyStore Explorer tool.
- Export the certificate chain, based on the generated key pair. Import the certificate into a new keystore (type: JKS). For example, keystore name: ms.keystore
- Put the keystore (fs.keystore) with the key pair in the configuration directory of the frontend server.
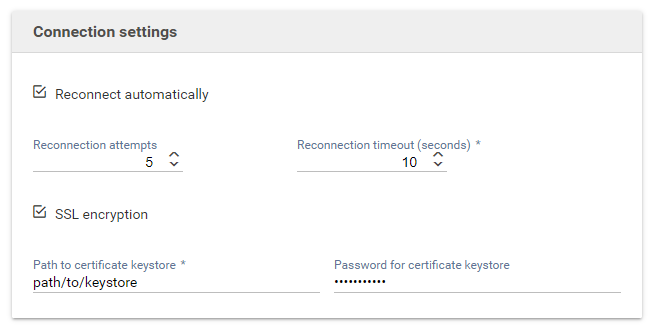
- On the frontend server, open the file application.properties (this is created automatically after installation) and add or edit the following entries:fs.settings.authKey=...
fs.settings.port=...
fs.settings.ssl.use=true
fs.settings.ssl.keystore.path=<Pfad zum Keystore>\\fs.keystore
fs.settings.ssl.keystore.pass=<Keystore Passwort> - Restart the frontend server
- Storing the keystore key certificate (ms.keystore) in the configuration directory of master server
- Customizing the frontend server configuration on the master server
- Check the connection